A SAGA microservice application - 4
Ok, we have seen how did we design the architecture of our microservice for aldimbilet.com in the previous posts. Then we have created the backbone system of the microservice and coded it. You must take a look at them in order to fully understand this one. It is time to create the small services and access databases. Since our 3 main service are very similar in nature, we will mostly focus on the details of the userservice here. Other 2 will also be similar restful web services projects. Let's put our big picture as usual.
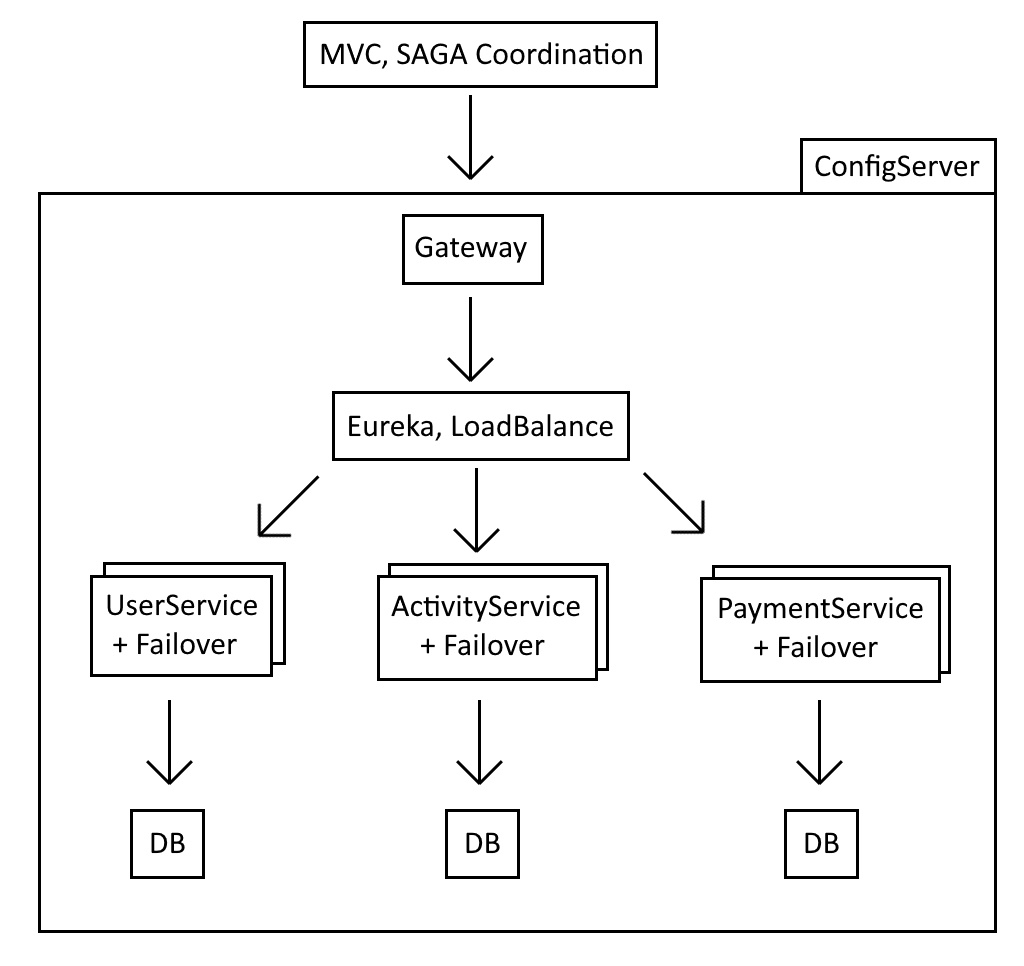
Userservices project and the pom file
We will have user registeration and login in our app. There will be different methods for each small functionality since we want to create services with smallest possible methods. For example we will have register, login and then getuserinfo methods separately. Think of it like this: You write a library all your methods contains as few lines of code as you can, considering separation of concerns. Because our MVC app on top will manage these methods with orchestration. We won't have business functions inside service methods. These services will operate on a certain data and will return if it works without an exception or not. This will become clear once we start coding.
I should also note here. I have connected all these 3 services to the same DB but ideally they would connect different databases or even different DB technologies. Because they can also have some caching mechanism to leverage or they could work reactively. I was too lazy to create different databases. You can techincally use different ones perfectly fine.
Let 's have a manifest here. All the new services will register themselves to Eureka. They will get the configurations from the config server, ultimately github. It will use JWT infrastructure for the endpoints and functions that would require user login. Don't worry i will cover that too. These are the mandatory steps no matter how many service you add. Now we go back to square one, Spring Initializr, to create userservice project likle below.
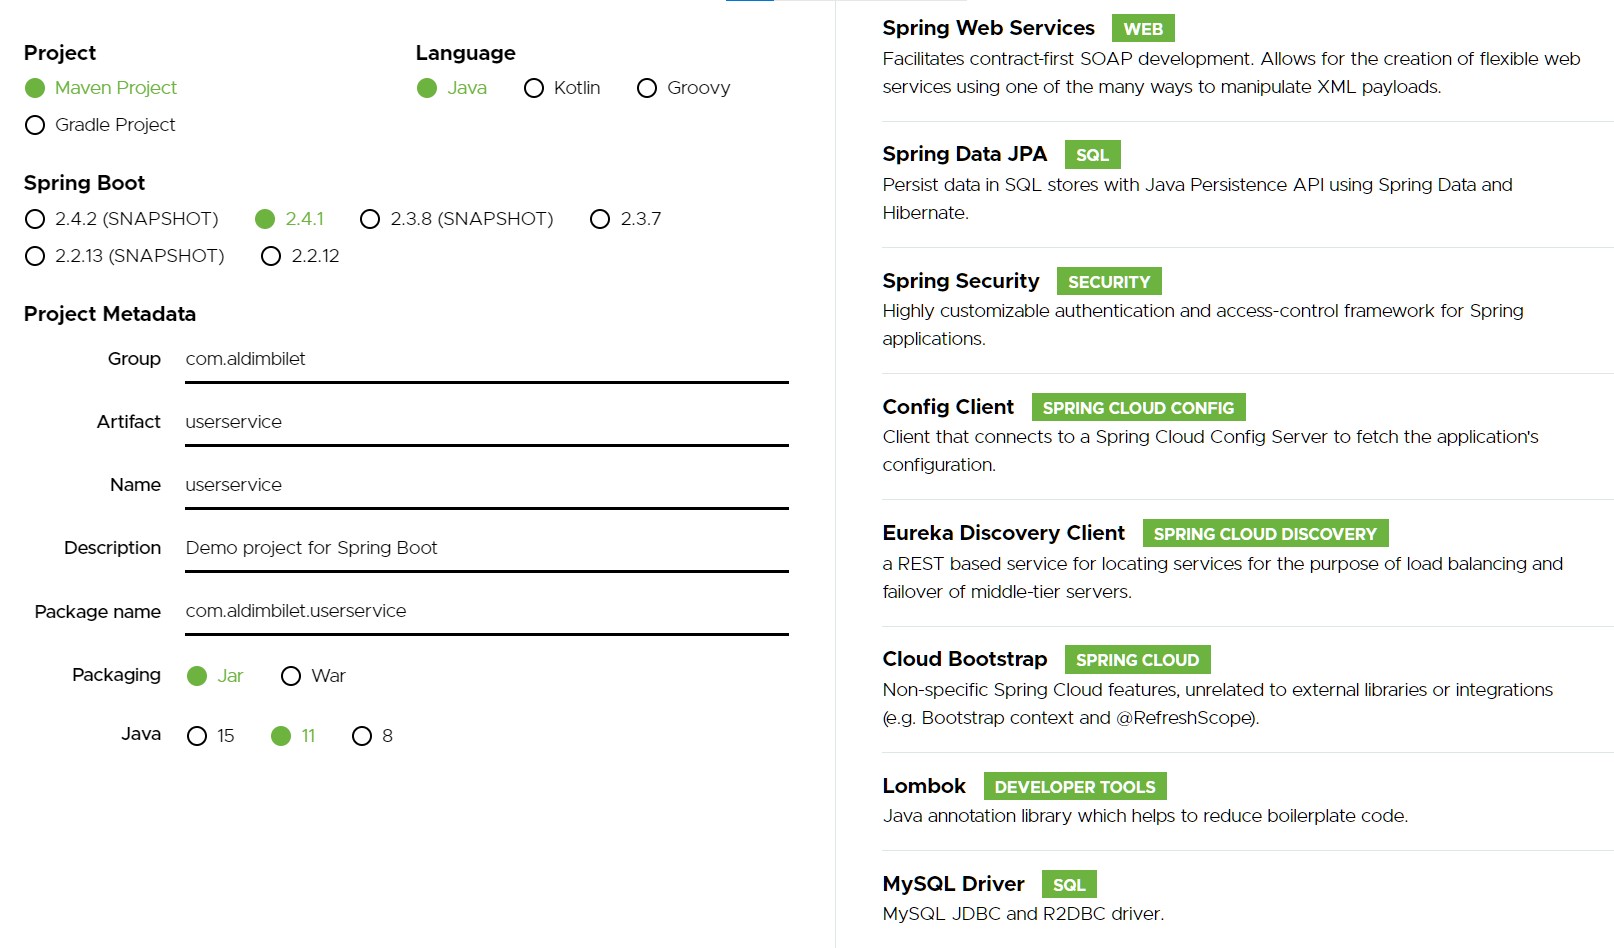
There is one more dependency needed for JWT infrastructure. You can find the most recent version in maven repository in the link below. Or just add this to the pom file:
<!-- https://mvnrepository.com/artifact/com.auth0/java-jwt -->
<dependency>
	<groupId>com.auth0</groupId>
	<artifactId>java-jwt</artifactId>
	<version>3.11.0</version>
</dependency>
Also i have created a helper project to bring the constants and helper classes together as a dependency. It is called "ab-util". It also allowed me to decrease duplicate codes. You can find it on github and clone it and add it to the pom file of the userservice like this:
<dependency>
	<groupId>com.aldimbilet</groupId>
	<artifactId>util</artifactId>
	<version>0.0.1-SNAPSHOT</version>
</dependency>
Let me go over the dependencies. We have spring web services (NOT WEB) because we only want to use and expose restful methods and relevant classes. JPA at the second is the Persistent API to help us operate on the database with code. We will use JWT with Spring Security structure that secures the endpoints using JWT. The service will be able getch relevant property files from the config server with Config client. The service will be able to register itself automatically and report to Eureka with Eureka client. And Bootstrap lets us read the properties from bootstrap.properties while launching the service.
Lombok will help us shorten the code of our pojos by providing getter and settar methods behind the scene. MySql driver is the connector to the DB that JPA will utilize. The critical one that defines the microservice is "Eureka client, Config client and the bootstrap". It won't be a proper micro service without these. Don't forget to check the spring cloud version being bigger than 2020... in the pom file. Not Hoxton or Greenwich.
Property files, JWT and Security
Let's begin with the property files. We have only 1 property in application.properties. The port number as 0. Why? Because we need a random port for this service. Why? If you develop lots of services, you may end up giving the same port number. This is a personal choice. But more importantly, you can run multiple instances of this service and register them to eureka. That way you can load balance among them. Random port number prevents port conflicts.
server.port = 0
There will be config server connection, service name and the profile info in the bootstrap.properties file.
spring.profiles.active=local
spring.application.name=ab-userservice

spring.cloud.config.discovery.service-id=ab-config-server
spring.cloud.config.fail-fast=true
spring.cloud.config.username=aldimbilet
spring.cloud.config.password=config

eureka.instance.instance-id=${spring.application.name}:${random.int(1,10000)}
"profile.active" here means it will look for ab-userserice-local.properties file to append properties from. It would be meaningless without Config client. But sometimes you may use (profile = "local") on your beans to create them for certain profiles. Or you can use a command line parameter like "-profile local" while launching so that the project looks for "application-local.properties" while running. But these are irrelevant in our context now.
Others are name for the Eureka server and the config server informations. Fail-fast means "if you fail to fetch configs, throw an error and inform me". Username and the password is the necessary security information to connect to config server. We have seen these settings in the previous post. But what on earth is that eureka.instance.instance-id?
I have mentioned that we would have the need to add new servers to our system without microservices. We were putting a jar or a war file on the server and adding physical processing power in order to handle the load. We have divided the system into small and independent pieces with microservices and used "lb://" while forwarding requests to load balance them. But where did the load go? Our userservice may not be able to handle all the requests by itself if it is a very popular service. Or it could be doing heavy operations or it can just crash. We must have a backup of this service and reach them sequentially.
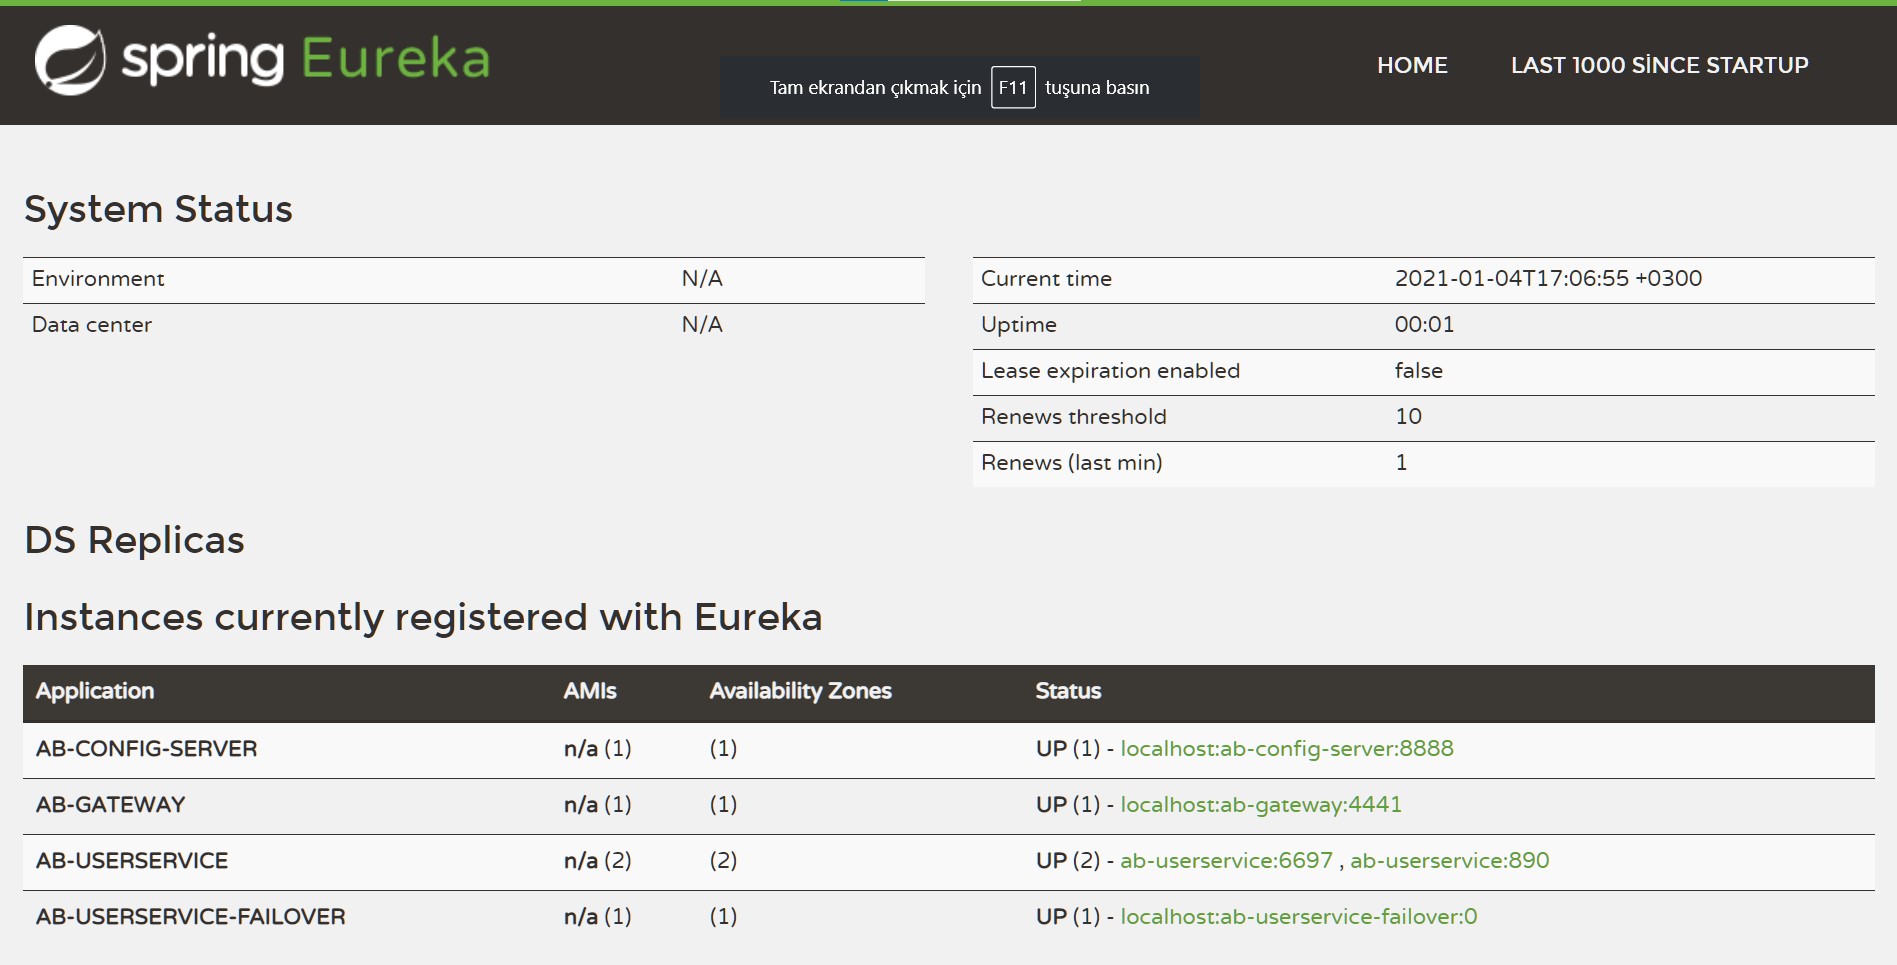
How are we going to achieve this? Simple, we will launch the service twice. It won't have a port conflict since we have given a random port. 2 instances of this service will be lanched and register themselves on eureka. Thus Eureka will be able to load balance among them. This id will help us see and reach these instances in the Eureka console. They have the same name and Eureka will group them together with (2) as the instance count. With this id, it will separate them. You will see the result of this in the bottom image later.
The rest of the property configurations are in the github repo, which was implemented in the previous post. You need to create a file named ab-userservice-local.properties and put Eureka server and DB config, so that this service can append them. Otherwise this service will look for Eureka at 8761 port (because we have eureka client dependency) and throw some sort of "could not connect" error. For the DB settings, you can copy and paste my settings if you are using MySql like me. You must download MySql and run it at 3306 default port and create a schema. The username can be "root" as default. Set the password as you wish. Here are the properties.
eureka.client.service-url.defaultZone=http://aldimbilet:eureka@localhost:4442/eureka

spring.jpa.hibernate.ddl-auto=update
spring.datasource.url=jdbc:mysql://localhost:3306/<schema>?user=root
spring.datasource.username=root
spring.datasource.password=<password>
spring.jpa.properties.hibernate.current_session_context_class = org.springframework.orm.hibernate5.SpringSessionContext
spring.jpa.properties.hibernate.dialect = org.hibernate.dialect.MySQL5Dialect
spring.datasource.initialization-mode = never
Now we actually have a small service to add in our microservice architecture. If you have a DB ready, this service can start and register itself to Eureka. It can fetch properties from config server. But of course this is not all we except from this service. Let's add a security layer. We have added spring security dependency and it will expect a username password for every request and endpoint. But we want JWT token while reaching to this service. Why? Because the service itself is not doing anything critical, there are some methods inside it which must require a user logged in. For example, login function is open to everyone but fetching user information must be authenticated.
So what is JWT? It is actually a data structure that holds some form of a session with some encrypted value. A central authority produces you a token (userservice in our example) and it has an expiration date or time. You can use the same token as much as you want within thşs timeframe. I didn't go much deeper on this because i don't like security much, but i know it is mostly used for granting authority and authenticating the requests. This JWT token travels inside the header of the http request with "Authorization" key. The value is usually like "Bearer asdasdqweqwe123123". We have 3 classes to produce JWT token and authenticate requests. Spring security will be handling the operations for us in the background.
Let's begin with the security configuration. I will write comments inside the code to explain it and keep it tidy. You can find all the code on Github.
import org.springframework.beans.factory.annotation.Autowired;
import org.springframework.context.annotation.Bean;
import org.springframework.context.annotation.Configuration;
import org.springframework.security.config.annotation.authentication.builders.AuthenticationManagerBuilder;
import org.springframework.security.config.annotation.web.builders.HttpSecurity;
import org.springframework.security.config.annotation.web.configuration.EnableWebSecurity;
import org.springframework.security.config.annotation.web.configuration.WebSecurityConfigurerAdapter;
import org.springframework.security.config.http.SessionCreationPolicy;
import org.springframework.security.crypto.bcrypt.BCryptPasswordEncoder;
import org.springframework.security.crypto.password.PasswordEncoder;
import org.springframework.web.cors.CorsConfiguration;
import org.springframework.web.cors.CorsConfigurationSource;
import org.springframework.web.cors.UrlBasedCorsConfigurationSource;
import com.aldimbilet.userservice.service.UserService;

@Configuration
// EnableWebSecurity indicates this is a securit config class
@EnableWebSecurity
public class SeConfig extends WebSecurityConfigurerAdapter
{
	@Autowired
	// UserService helps us with the user operations
	UserService userDetailsService;

	@Autowired
	public void configureGlobal(AuthenticationManagerBuilder auth) throws Exception
	{
		// In the UserService class, we encrypt the passwords of the users
		auth.userDetailsService(userDetailsService).passwordEncoder(passwordEncoder());
	}

	@Bean
	public PasswordEncoder passwordEncoder()
	{
		// BCryptPasswordEncoder is an ideal encryptor
		return new BCryptPasswordEncoder();
	}

	@Override
	protected void configure(HttpSecurity http) throws Exception
	{
		// In order to transport JWT headers, disable CSRF protection
		http.csrf().disable();
		// Have no idea what is cors :)
		http.cors();
		// "/user" endpoint will be used in all endpoint of this service
		// Remember we have configured gateway routings for this path
		// login and register endpoints will be free to reach
		http.authorizeRequests().antMatchers("/user/login/**").permitAll();
		http.authorizeRequests().antMatchers("/user/register/**").permitAll();
		http.authorizeRequests().anyRequest().authenticated();
		// Filter concept is to filter the incoming request, we add our own filters to the system
		// Instead of using default spring security filters, we will use our own JWT filters
		// So we create custom filters out of new classess called JWTAuthenticationFilter and JWTAuthorizationFilter
		http.addFilter(new JWTAuthenticationFilter(authenticationManager()));
		http.addFilter(new JWTAuthorizationFilter(authenticationManager()));
		// disable the sessions because JWT tokens will be preserved in MVC app
		http.sessionManagement().sessionCreationPolicy(SessionCreationPolicy.STATELESS);
	}

	// This is copy and paste :)
	// Security is a deep subject and i don't want to get involved
	@Bean
	CorsConfigurationSource corsConfigurationSource()
	{
		final UrlBasedCorsConfigurationSource source = new UrlBasedCorsConfigurationSource();
		CorsConfiguration corsConfiguration = new CorsConfiguration().applyPermitDefaultValues();
		source.registerCorsConfiguration("/**", corsConfiguration);
		return source;
	}
}
This class was the security adapter for the spring security. Now we need to write the classes to create and check JWT information. Comments are in the code.
import java.io.IOException;
import java.util.Date;
import javax.servlet.FilterChain;
import javax.servlet.ServletException;
import javax.servlet.http.HttpServletRequest;
import javax.servlet.http.HttpServletResponse;
import org.springframework.http.HttpStatus;
import org.springframework.security.authentication.AuthenticationManager;
import org.springframework.security.authentication.UsernamePasswordAuthenticationToken;
import org.springframework.security.core.Authentication;
import org.springframework.security.core.AuthenticationException;
import org.springframework.security.core.userdetails.User;
import org.springframework.security.web.authentication.UsernamePasswordAuthenticationFilter;
import com.aldimbilet.userservice.model.ABUser;
import com.aldimbilet.util.JWTUtils;
import com.auth0.jwt.JWT;
import com.auth0.jwt.algorithms.Algorithm;
import com.fasterxml.jackson.databind.ObjectMapper;

public class JWTAuthenticationFilter extends UsernamePasswordAuthenticationFilter
{
	// This is set from the security config
	private AuthenticationManager authenticationManager;

	public JWTAuthenticationFilter(AuthenticationManager authenticationManager)
	{
		this.authenticationManager = authenticationManager;
		// This part is especially important because spring security uses /login as default endpoint
		// But we have routed /users paths to this service
		// That is why we need to override it
		setFilterProcessesUrl("/user/login");
	}

	@Override
	public Authentication attemptAuthentication(HttpServletRequest req, HttpServletResponse res) throws AuthenticationException
	{
		// This is the part we extract the username and password from JWT and convert it to a user class
		// Spring security will automatically query the user table in the database by using this class
		try
		{
			// We can map the incoming data inside the request to our ABUser class
			// We will write this class as a POJO and have username and password variable inside it
			// It is always easiest to conform spring security defaults
			// Otherwise we would receive spring security User class and we would have to map it ourselves
			ABUser creds = new ObjectMapper().readValue(req.getInputStream(), ABUser.class);
			// There is something strange here because it could throw different exceptions
			// You may have to write try with multiple catch blocks for userlogin inside the MVC app
			// Maybe it would be best practice to return status codes inside response, instead of throwing exceptions
			return authenticationManager.authenticate(new UsernamePasswordAuthenticationToken(creds.getUsername(), creds.getPassword(), creds.getRoles()));
		}
		catch (IOException e)
		{
			throw new RuntimeException(e);
		}
	}

	@Override
	protected void unsuccessfulAuthentication(HttpServletRequest request, HttpServletResponse response, AuthenticationException failed) throws IOException, ServletException
	{
		// The username and password comes with the JWT, get decrypted and spring security queries it in the DB
		// If it is unsuccessful, it goes into here and returns UNAUTHORIZED as response status
		// Some mvc app or other app will get the UNAUTHORIZED (401) status as an indicator
		response.setStatus(HttpStatus.UNAUTHORIZED.value());
		response.getWriter().flush();
	}

	@Override
	protected void successfulAuthentication(HttpServletRequest req, HttpServletResponse res, FilterChain chain, Authentication auth) throws IOException
	{
		// The username and password comes with the JWT, get decrypted and spring security queries it in the DB
		// If it is successful, it goes into here
		// This User class is the spring security user class, not our custom ABUser class
		// The AuthenticationManager above expects a spring security User class to work
		// The JWT token is prduced with the username, which is a unique value
		String token = JWT.create().withSubject(((User) auth.getPrincipal()).getUsername()).withExpiresAt(new Date(System.currentTimeMillis() + 900000)).sign(Algorithm.HMAC512(JWTUtils.SECRET_KEY.getBytes()));
		// You can return token and username or any other data in the response
		// My return value is "(numan) asdasdqwe123" but ideally it would be some json value
		String body = "(" + ((User) auth.getPrincipal()).getUsername() + ") " + token;
		// Write the token inside the body
		res.getWriter().write(body);
		res.getWriter().flush();
	}
}
JWTAuthenticationFilter class was the JWT producer class and it has the succesful and unsuccessful authentication methods. There will also be JWTAuthorizationFilter class. This one will extract the user from JWT header and send it to authentication. It will also define the filter to add the spring security.
import java.io.IOException;
import java.util.ArrayList;
import javax.servlet.FilterChain;
import javax.servlet.ServletException;
import javax.servlet.http.HttpServletRequest;
import javax.servlet.http.HttpServletResponse;
import org.springframework.security.authentication.AuthenticationManager;
import org.springframework.security.authentication.UsernamePasswordAuthenticationToken;
import org.springframework.security.core.GrantedAuthority;
import org.springframework.security.core.context.SecurityContextHolder;
import org.springframework.security.web.authentication.www.BasicAuthenticationFilter;
import com.aldimbilet.util.Constants;
import com.aldimbilet.util.JWTUtils;
import com.auth0.jwt.JWT;
import com.auth0.jwt.algorithms.Algorithm;

public class JWTAuthorizationFilter extends BasicAuthenticationFilter
{
	public JWTAuthorizationFilter(AuthenticationManager authManager)
	{
		// authManager was sent from security config, we report it to superclass (spring security)
		super(authManager);
	}

	@Override
	protected void doFilterInternal(HttpServletRequest req, HttpServletResponse res, FilterChain chain) throws IOException, ServletException
	{
		// This is where the filtering is done for the BasicAuthenticationFilter we have written
		// Because normally there is no default filter to handle JWT request headers in spring security
		// We get the "Authorization" key-value from the header (the Constants class is in the "ab-util" project on github)
		String header = req.getHeader(Constants.HEADER_STRING);
		// The header must start with "Bearer ". For example "Bearer asdasdqweqwe123123"
		if (header == null || !header.startsWith(Constants.TOKEN_PREFIX))
		{
			// If there are no JWT header, continue with usual filters
			chain.doFilter(req, res);
			return;
		}
		// If there is a header set the authentication method to context for spring security to use
		// getAuthentication method parses the JWT token from the header, method is down below
		UsernamePasswordAuthenticationToken authentication = getAuthentication(req);
		// Put it in the context
		SecurityContextHolder.getContext().setAuthentication(authentication);
		// continue with spring security filters
		chain.doFilter(req, res);
	}

	private UsernamePasswordAuthenticationToken getAuthentication(HttpServletRequest request)
	{
		// Extract the "Bearer" from the "Authorization" request header
		String token = request.getHeader(Constants.HEADER_STRING);
		if (token != null)
		{
			// Parse the token, JWTUtils class is in the ab-util project
			// Replace the "Bearer" string with ""
			String user = JWT.require(Algorithm.HMAC512(JWTUtils.SECRET_KEY.getBytes())).build().verify(token.replace(Constants.TOKEN_PREFIX, "")).getSubject();
			if (user != null)
			{
				return new UsernamePasswordAuthenticationToken(user, null, new ArrayList<GrantedAuthority>());
			}
			return null;
		}
		return null;
	}
}
Endpoints and user operations
Security is ok now. From now on, the rest endpoints of this service will expect a JWT header with "Authorization" key and "Bearer asdasdqwe123" value. In order to produce this token, we will send a username and password information in a json format. This will be inside the MVC app. Let's create the endpoints for methods. Again, i will write the comments inside the code but i will keep it short. You can find the helper classes on Github. It is a little bit out of scope.
import org.springframework.beans.factory.annotation.Autowired;
import org.springframework.core.env.Environment;
import org.springframework.http.HttpStatus;
import org.springframework.http.ResponseEntity;
import org.springframework.web.bind.annotation.GetMapping;
import org.springframework.web.bind.annotation.PostMapping;
import org.springframework.web.bind.annotation.RequestBody;
import org.springframework.web.bind.annotation.RequestMapping;
import org.springframework.web.bind.annotation.RestController;
import com.aldimbilet.pojos.CardInfoPojo;
import com.aldimbilet.pojos.UserInfoPojo;
import com.aldimbilet.pojos.UserRegisterPojo;
import com.aldimbilet.userservice.model.ABUser;
import com.aldimbilet.userservice.model.CardInfo;
import com.aldimbilet.userservice.repo.CardRepository;
import com.aldimbilet.userservice.service.UserService;
import com.aldimbilet.userservice.util.MapperUtils;
import com.aldimbilet.util.JacksonUtils;

@RestController
// All of the endpoints of this service will start with "/user" and gateway will route with this
// You can check Routelocators there
@RequestMapping(path = "/user")
public class UserController
{
	@Autowired
	Environment environment;

	@Autowired
	UserService userService;

	@Autowired
	CardRepository cardRepo;

	@GetMapping(path = "hello")
	public ResponseEntity<String> hello()
	{
		// We use /user/hello endpoint so that we can know which service is responding under load balancing. Port number is random.
		ResponseEntity<String> entity = new ResponseEntity<>("body " + environment.getProperty("local.server.port"), HttpStatus.OK);
		return entity;
	}

	@PostMapping(path = "register")
	// You have to add @RequestBody parameter in @PostMapping operations
	// The body can be any class or data structure you want
	public ResponseEntity<String> register(@RequestBody UserRegisterPojo userInfo)
	{
		// You can see this endpoint is free to reach in security antmatchers
		// UserRegisterPojo is in the "util" project
		ABUser newUser = MapperUtils.convertUserRegisterPojoToABUser(userInfo);
		ResponseEntity<String> entity;
		// There should not be validation here, so that this service can stay micro
		// This method just return DB erros or data errors
		if (userService.save(newUser))
		{
			// 200
			entity = new ResponseEntity<>(HttpStatus.OK);
		}
		else
		{
			// 500
			entity = new ResponseEntity<>(HttpStatus.INTERNAL_SERVER_ERROR);
		}
		return entity;
	}

	@GetMapping(path = "getUserInfo")
	public ResponseEntity<UserInfoPojo> getUserInfo(@RequestParam String username)
	{
		ABUser user = userService.findByUsername(username);
		UserInfoPojo pojo = MapperUtils.convertABUserToUserInfoPojo(user);
		ResponseEntity<UserInfoPojo> entity;
		// Instead of returning the whole user information, i have created a pojo and used it both here and in the MVC app
		entity = new ResponseEntity<>(pojo, HttpStatus.OK);
		return entity;
	}

	@GetMapping(path = "getUserCard")
	public ResponseEntity<CardInfoPojo> getUserCard(@RequestParam Long userId)
	{
		// getUserCard returns the credit card information of the user stored in DB
		CardInfo info = cardRepo.findByUserId(userId);
		CardInfoPojo pojo = MapperUtils.convertCardInfoToCardInfoPojo(info);
		ResponseEntity<CardInfoPojo> entity;
		// This is a fault tolerance from business perspective
		// If i can't retrieve the card info from DB, i returned it as 500 code
		// This could also be a response with 200 and could have another data returned, maybe it would be bit more suitable
		// Keep in mind, your desicions here will affect FeignClient classes in the MVC app
		if (pojo != null)
		{
			entity = new ResponseEntity<>(pojo, HttpStatus.OK);
		}
		else
		{
			entity = new ResponseEntity<>(null, HttpStatus.INTERNAL_SERVER_ERROR);
		}
		return entity;
	}
}
Note here. There is a UserService class we are using. There is a blueprint that spring security provides us for user operations. They are are advising the developers to develop their own repository classes and use them with this blueprint class. Let me write the imporntant bits.
import org.springframework.beans.factory.annotation.Autowired;
import org.springframework.security.core.userdetails.User.UserBuilder;
import org.springframework.security.core.userdetails.UserDetails;
import org.springframework.security.core.userdetails.UserDetailsService;
import org.springframework.security.crypto.password.PasswordEncoder;
import org.springframework.stereotype.Service;
import org.springframework.transaction.annotation.Transactional;
import com.aldimbilet.userservice.model.ABUser;
import com.aldimbilet.userservice.repo.UserRepository;

@Service
// We are using UserDetailsService interface from spring security
public class UserService implements UserDetailsService
{
	@Autowired
	UserRepository userRepository;

	@Autowired
	// PasswordEncoder bean was produced in security config class above
	PasswordEncoder bCryptPasswordEncoder;

	@Override
	@Transactional(readOnly = true)
	public UserDetails loadUserByUsername(String username)
	{
		// ABUser is our own user class
		ABUser user = userRepository.findByUsername(username);
		// We create a UserBuilder class of spring secuirty with this user information
		UserBuilder builder = org.springframework.security.core.userdetails.User.withUsername(user.getUsername());
		// We set the password and the roles of the user and wrap them up
		builder.password(user.getPassword());
		builder.authorities(user.getRoles());
		return builder.build();
	}

	public boolean save(ABUser user)
	{
		// Enrypt the passwords before saving the user
		user.setPassword(bCryptPasswordEncoder.encode(user.getPassword()));
		return userRepository.save(user);
	}

	public ABUser findByUsername(String username)
	{
		return userRepository.findByUsername(username);
	}

	public ABUser findById(Long userId)
	{
		return userRepository.findById(userId);
	}
}
If you write the repository and entity classes, our userservice is ready with the endpoints and security measures. If you can configure the database and import "ab-util" project, you can run this service with Run as -> Spring Boot Application. You can do this 2-3 times to let it run multilpe times. You can also observe this on Eureka.
Failover service
Now wee need to implement ab-userservice-failover service to respond when the userservice is not available. After all, we have to consider resilience and fault tolerance. I won't write this service with detail. It only has one @Controller class and it responds to get and post operations. Since we have get and post methods inside the userservice, they will also be forwarded here as get and post methods by the gateway. We would need a put method if there were a put method for example.
Userservice-failover will have web services, config client, eureka client and bootstrap as depedencies. You should have port number 0 for random port in application.properties. You must set the name "ab-userservice-failover", profile=local and config server information in bootstrap.properties. These are almost the same with "userservice". And the "ab-userservice-failover-local.properties" file on github must contain Eureka connection information as usual. Same as userservice. Now you can create a controller in this project.
import org.springframework.http.HttpStatus;
import org.springframework.http.ResponseEntity;
import org.springframework.web.bind.annotation.GetMapping;
import org.springframework.web.bind.annotation.PostMapping;
import org.springframework.web.bind.annotation.RequestBody;
import org.springframework.web.bind.annotation.RestController;

@RestController
public class UserServiceController
{
	// Gateway codes are in the previous post, it routes to "forward/user-failover" if it can't reach userservice
	// You can return response status OK with some other information here
	// I used <Object> so that i can cover all the GET and Set methods
	@RequestMapping(path = "user-failover", method = RequestMethod.GET)
	public ResponseEntity<Object> userServiceFails()
	{
		ResponseEntity<Object> entity = new ResponseEntity<>("user service is down", HttpStatus.SERVICE_UNAVAILABLE);
		return entity;
	}

	@RequestMapping(path = "user-failover", method = RequestMethod.POST)
	public ResponseEntity<Object> userServiceFails(@RequestBody Object body)
	{
		ResponseEntity<Object> entity = new ResponseEntity<>("user service is down", HttpStatus.SERVICE_UNAVAILABLE);
		return entity;
	}
}
This failover service can run and register at Eureka with only 1 controller class. Even though it is not mandatory, you can run more than 1 of this too. You can develop activityservice and payment services by yourself for learning purposes. They are almost identical to userservice and failover. Let me write down the guide to add a new service to the system.
-
Create a spring boot project with these dependencies.
- spring-boot-starter-web-services
- spring-boot-starter-security
- spring-cloud-starter-config (client)
- spring-cloud-starter-bootstrap
- spring-cloud-starter-netflix-eureka-client
- Add the dependency for JWT
- You must also add the dependency for "ab - util" project to pom
- Set server.port = 0 in application.properties
-
bootstrap.properties must have these vales at least
- spring.application.name = <app_name>
- eureka.instance.instance-id=${spring.application.name}:${random.int(1,10000)}
- spring.cloud.config.discovery.service-id=ab-config-server
- spring.cloud.config.fail-fast=true
- spring.cloud.config.username=aldimbilet
- spring.cloud.config.password=config
- spring.profiles.active=<profile>
- Add a file named <app_name>-<profile>.properties to the config repo on github
- Write eureka connection to this file
- Either just copy and paste BasicAuthenticationFilter from userservice or create an extension
- Either just copy and paste UsernamePasswordAuthenticationFilter from userservice or create an extension
- Create a WebSecurityConfigurerAdapter class or copy paste it from userservice
- Create a @Controller with @GetMapping, @PostMapping methods
- Don't forget to add @RequestBody parameter for @PostMapping methods
- Return ResponseEntity<T> where T is a class or data structure you want
- Note the mapping type, path, parameters and the return type to use it later in the MVC app
- Decide if user login is necessary
- If not, you must add permitall() for all antmatcher paths (/**) in security config
- If login is required, add the antmatchers for those endpoints
- Add the necessary routing for the service in the gateway like "/<myservice>"
- If you develop a failover service, don't forget to add routing for it too
If userservice and the failover are ready and running, you should be able to see them in Eureka console like the image below. Userservice is running 2 instances so the console shows (2) as the count. You can see 2 links for userservice because we have given a random id to this service. Failover doesn't have an id so we see 0 as port number. But it actually assigned to a random port. Spring boot can't update this info while start up.
The REST is up to you
See what i did there :) You can add the other services or new ones with this guide. The hardest part of the userservices was finding an up-to-date (December 2020) Java example of JWT usage. There were not much information about how to produce and consume it, where is it saved or how is it transfered kind of information out there. Because most of the blog posts about the microservices are talking about tools or the architecture. Also, i didn't know @RequestBody was mandatory in post methods in the userservice and it caused me lots of headache. I was wondering why the same method name and parameter can't be found in the userservice by the MVC app. Which also involves confusion with Feign there.
We now have coded most of the microservice design. These were the services. I salute you if you have come to this point with me :) Now we need to run and utilise these methods and orchestrate them with the MVC client app. We have divided the functionalities that we have covered at the beginning. It is time to operate on them and make them talk to each other.
This was again a very long post but i told you that the microservices can't be understood with "this code does this" method. Even though a small userservice uses JWT headers and does basic DB read operations, all the coding is a result of a desicion or yields a desicion somwhere else. It creates benefits and also disadvantages. This is why commenting the code and writing at the same time is the most effective way to learning. See you at the next post where we will develop the MVC app :)
Leave a comment