Microservice + RabbitMQ application - 3
This is the 3rd post of the microservices with RabbitMQ. Let me summarize what have we done. There is a microservice project running with spring cloud here. We will integrate rabbitmq with basic features in this project. We are not going to change the whole project for rabbitmq or write a brand new project from scratch. We are focusing on the role of message brokers, the capabilities of rabbitmq and the analysis of the gains and disadvantages. We have already covered that we will use rabbitmq to reach the mail service and installed rabbitmq on our computer. In this post we will start sending messages (payloads) from the MVC application to rabbitmq. Let's put the grand architecture here.
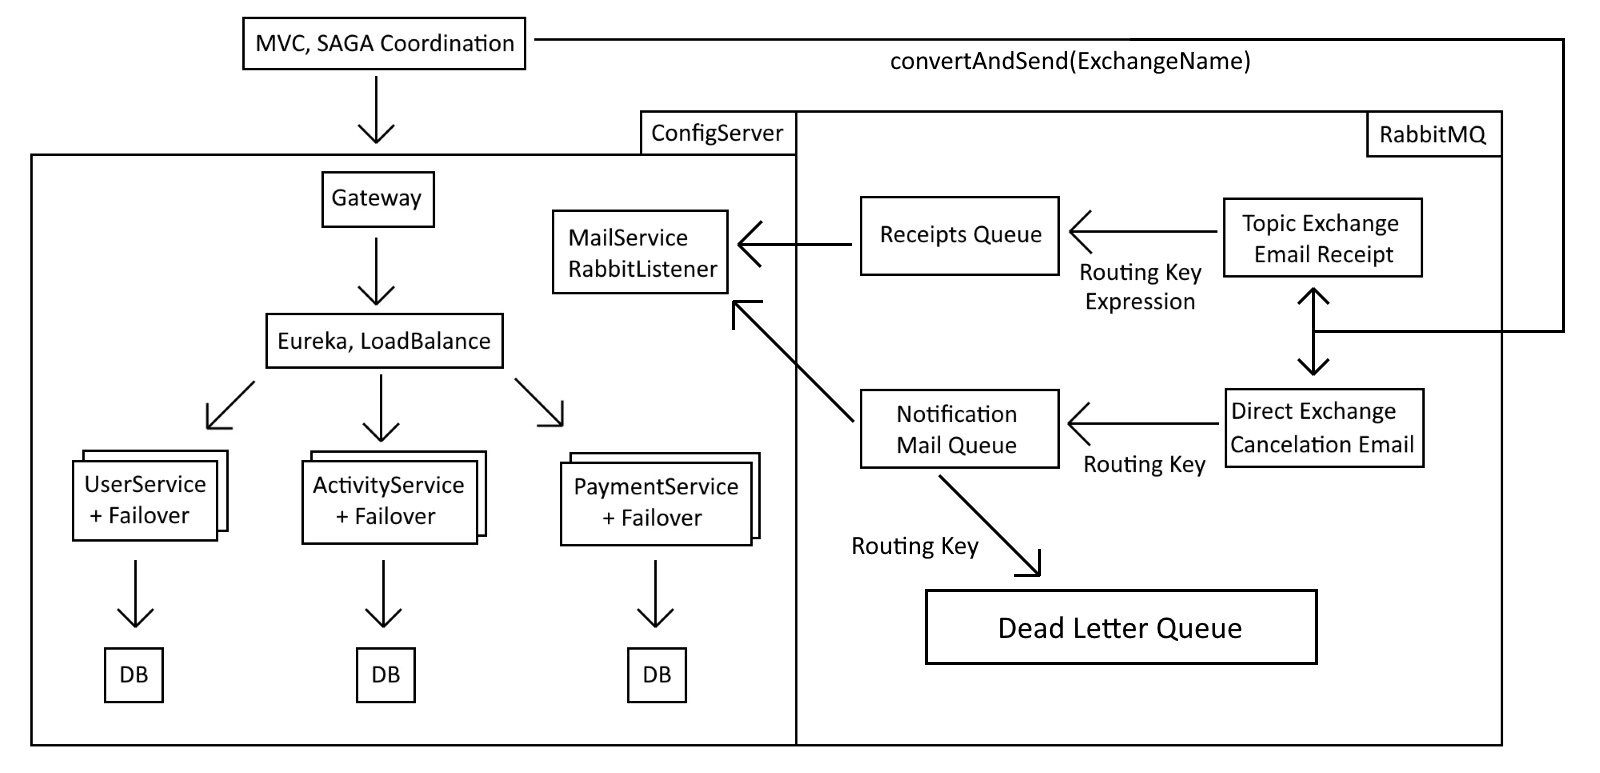
Sending messages with Spring AMQP
Since we have developed a spring cloud application, we will continue using spring cloud libraries. The dependency to send messages to rabbitmq is Spring AMQP. It basically connects your application to rabbitmq behind the scenes. It knows where is rabbitmq (because there is a service running) and how it expects the messages. You can also describe custom properties for rabbitmq to connect wherever it is. First things first, let's add the dependency to pom file of the MVC application.
<dependency>
	<groupId>org.springframework.boot</groupId>
	<artifactId>spring-boot-starter-amqp</artifactId>
</dependency>
In order to utilise this dependency, all you need to do is to create exhanges, queues and bindings with routing keys. Spring boot will create your beans, create a rabbitmqtemplate (connector) and inject those beans. What is the most commonly used method for creating beans? Create a configuration class. Like this:
import org.springframework.amqp.core.Binding;
import org.springframework.amqp.core.BindingBuilder;
import org.springframework.amqp.core.DirectExchange;
import org.springframework.amqp.core.Queue;
import org.springframework.amqp.core.QueueBuilder;
import org.springframework.amqp.core.TopicExchange;
import org.springframework.amqp.rabbit.connection.ConnectionFactory;
import org.springframework.amqp.rabbit.connection.CorrelationData;
import org.springframework.amqp.rabbit.core.RabbitTemplate;
import org.springframework.amqp.rabbit.core.RabbitTemplate.ConfirmCallback;
import org.springframework.amqp.support.converter.Jackson2JsonMessageConverter;
import org.springframework.beans.factory.annotation.Value;
import org.springframework.context.annotation.Bean;
import org.springframework.context.annotation.DependsOn;
import org.springframework.stereotype.Component;

@Component
// Bean names in this config is necessary to avoid confusion
// We are creating same bean types across spring boot
// If you don't specify bean names, spring boot will inject wrong ones
public class RabbitConfig
{
	@Bean(name = "emailReceiptTopic")
	public TopicExchange rabbitTopic()
	{
		return new TopicExchange("emailReceiptTopic");
	}

	@Bean(name = "emailReceiptQueue")
	public Queue emailReceiptQueue()
	{
		return new Queue("emailReceiptQueue", true);
	}

	@Bean
	@DependsOn(value =
	{ "emailReceiptTopic", "emailReceiptQueue" })
	public Binding emailReceiptBinding(TopicExchange exchange, Queue emailReceiptQueue)
	{
		// Bind the emailReceiptQueue to an exchange with a routing key definiton
		// The messages starting with "email.receipt." will be used in exchange to bind it to emailReceiptQueue
		return BindingBuilder.bind(emailReceiptQueue).to(exchange).with("email.receipt.*");
	}

	@Bean(name = "emailCancelationDirect")
	public DirectExchange rabbitDirect()
	{
		return new DirectExchange("emailCancelationDirect");
	}

	@Bean(name = "emailCancelationQueue")
	public Queue emailCancelationQueue()
	{
		// This one will redirect the undeliverable messages to deadLetterExchange with "email.cancelation.deadletter" route
		// Deadletter works as direct exchange (could have been topic or fanout too)
		return QueueBuilder.durable("emailCancelationQueue").withArgument("x-dead-letter-exchange", "deadLetterExchange").withArgument("x-dead-letter-routing-key", "email.cancelation.deadletter").build();
	}

	@Bean
	@DependsOn(value =
	{ "emailCancelationDirect", "emailCancelationQueue" })
	public Binding deadLetterBinding(@Value("emailCancelationDirect") DirectExchange direct, @Value("emailCancelationQueue") Queue emailCancelationQueue)
	{
		// Bind the emailCancelationQueue to an exchange with a routing key
		// The exact messages "email.cancelation" will be used in exchange to bind it to emailCancelationQueue
		return BindingBuilder.bind(emailCancelationQueue).to(direct).with("email.cancelation");
	}

	@Bean(name = "deadLetterExchange")
	public DirectExchange deadLetterExchange()
	{
		return new DirectExchange("deadLetterExchange");
	}

	@Bean(name = "deadLetterQueue")
	public Queue deadLetterQueue()
	{
		return QueueBuilder.durable("deadLetterQueue").build();
	}

	@Bean
	@DependsOn(value =
	{ "deadLetterExchange", "deadLetterQueue" })
	public Binding emailCancelationBinding(@Value("deadLetterExchange") DirectExchange deadExchange, @Value("deadLetterQueue") Queue deadLetterQueue)
	{
		// DO NO FORGET "spring.rabbitmq.listener.simple.default-requeue-rejected=false" in the application.properties of the receiver service !!
		// Bind the deadLetterQueue to the deadLetterExchange with a routing key
		// The exact messages "email.cancelation.deadletter" will be used in deadLetterExchange to bind it to deadLetterQueue
		return BindingBuilder.bind(deadLetterQueue).to(deadExchange).with("email.cancelation.deadletter");
	}

	@Bean
	private RabbitTemplate setReturnCallback(ConnectionFactory connectionFactory)
	{
		RabbitTemplate myCustomTemplate = new RabbitTemplate(connectionFactory);
		// This is not mandatory, for logging purposes
		ConfirmCallback confirmCallback = new ConfirmCallback()
		{
			@Override
			public void confirm(CorrelationData correlationData, boolean ack, String cause)
			{
				// This log is to be notified if the payload is succesfully delivered to rabbitmq
				// It acks true even if the message goes to deadletter queue
				// It doesn't return any data because we are not expecting a message from the consumer
				System.err.println("Returned: " + correlationData.getReturned());
				System.err.println("Ack: " + ack);
				System.err.println("Cause: " + cause);
				System.err.println();
			}
		};
		myCustomTemplate.setConfirmCallback(confirmCallback);
		// If you forget this message converter, you can't send custom classes
		// Your app will give "SimpleMessageConverter only supports String, byte[] and Serializable payloads" error
		// If this bean is not initialized before the template, the same error occurs
		// The default converter is org.springframework.messaging.converter.SimpleMessageConverter
		myCustomTemplate.setMessageConverter(new Jackson2JsonMessageConverter());
		return myCustomTemplate;
	}
}
Notice we also configure a RabbitTemplate with default connection factory, which knows how to connect to rabbitmq. And there is a little logging inside that template with confirmcallbak. In order to make this work, you also have to set confirm type in the application.properties like below. This logging isn't mandatory.
# We need to set the confirmation type so that we can get the ack info
# This is not return info, a return info emerges when you use convertandsendandreceive
spring.rabbitmq.publisher-confirm-type=correlated
This @Component class will be initiated and 3 exchanges, therefore 3 bindings will be created. 1 topic and 2 direct exchanges. There are also 3 queues for these 3 exchanges. There will be 1 exchange and 1 queue and 1 binding for 3 operations. When somebody buys a ticket, an email with the receipt will be sent. If an event is canceled, the system will send emails to all users for demonstration purposes. And if there is an undeliverable message in this cancelation emails queue, the message will go to dead letter queue and stay there.
We will use these now in MVC application. But i will not write the whole code from the existing project. You have to autowire RabbitTemplate which was configured in the config class above. You can use template.convertAndSend method to convert your custom class to payload with Jackson2JsonMessageConverter and send. You can write this inside the payment method in the MVC application. I have simulated some condition here. If the customer id is an even number, it sends a special message.
You can see the logic of topic exchange here. One method sends "email.receipt.special" and the other "email.receipt.normal" as routing key. The topic for this exchange was "email.receipt.*". So you can use any kind of email formats here to notify the same emailing queue. We used the email as topic here.
import org.springframework.amqp.core.DirectExchange;
import org.springframework.amqp.core.TopicExchange;
import org.springframework.amqp.rabbit.connection.CorrelationData;
import org.springframework.amqp.rabbit.core.RabbitTemplate;

// See RabbitConfig
private RabbitTemplate template;

// To simulate different routing keys reaching to same queue
if (infoPojo.getId() % 2 == 0)
{
	// Make sure you have a converter bean defined somewhere to send custom classes
	// The topic exchange listens for routing keys with a format
	// Here it is "email.receipt.*" so "email.receipt.special" and "email.receipt.normal" will go to the same topic
	template.convertAndSend(emailReceiptTopic.getName(), "email.receipt.special", infoPojo);
}
else
{
	template.convertAndSend(emailReceiptTopic.getName(), "email.receipt.normal", infoPojo);
}
There is one more function. I have also developed a page to cancel an event. It is not the focus of this blog post, so i am skipping the details of the page. The cancelation messages will go to direct exchange in rabbitmq so we will use exact routing matches here. For demonstration purpuses, you can send emails to all the users in the system. Notice here we have the CorrelationData here to track the acknowledgement. The data requires a unique value to be tracked, so that it is not confused with others.
for (UserInfoPojo userInfoPojo : resp)
{
	// correlationData is required with a unique identifier to be able to get ack info
	CorrelationData correlationData = new CorrelationData(userInfoPojo.getId().toString());
	// Cancelation email queue is bounded to a directexchange
	// Meaning it will only accept exact matches of "email.cancelation"
	// You just have to mention exchange name and the related binding, the rest is up to rabbitmq
	template.convertAndSend(emailCancelationDirect.getName(), "email.cancelation", userInfoPojo, correlationData);
}
RabbitMQ management console
Now you are wondering where are all these messages are going. You haven't created anything anywhere but spring amqp and rabbitmq will talk to each other and create the necessary structures. You can see all the nodes, exchanges, queues and bindings in the rabbitmq console. There is also monitoring, reporting, settings and etc. here but we will stick to basics. In order to reach rabbitmq console you need to install the managament plugin. You can use this command on windows to enable it:
<rabbitmq installation folder>\sbin>rabbitmq-plugins enable rabbitmq_management
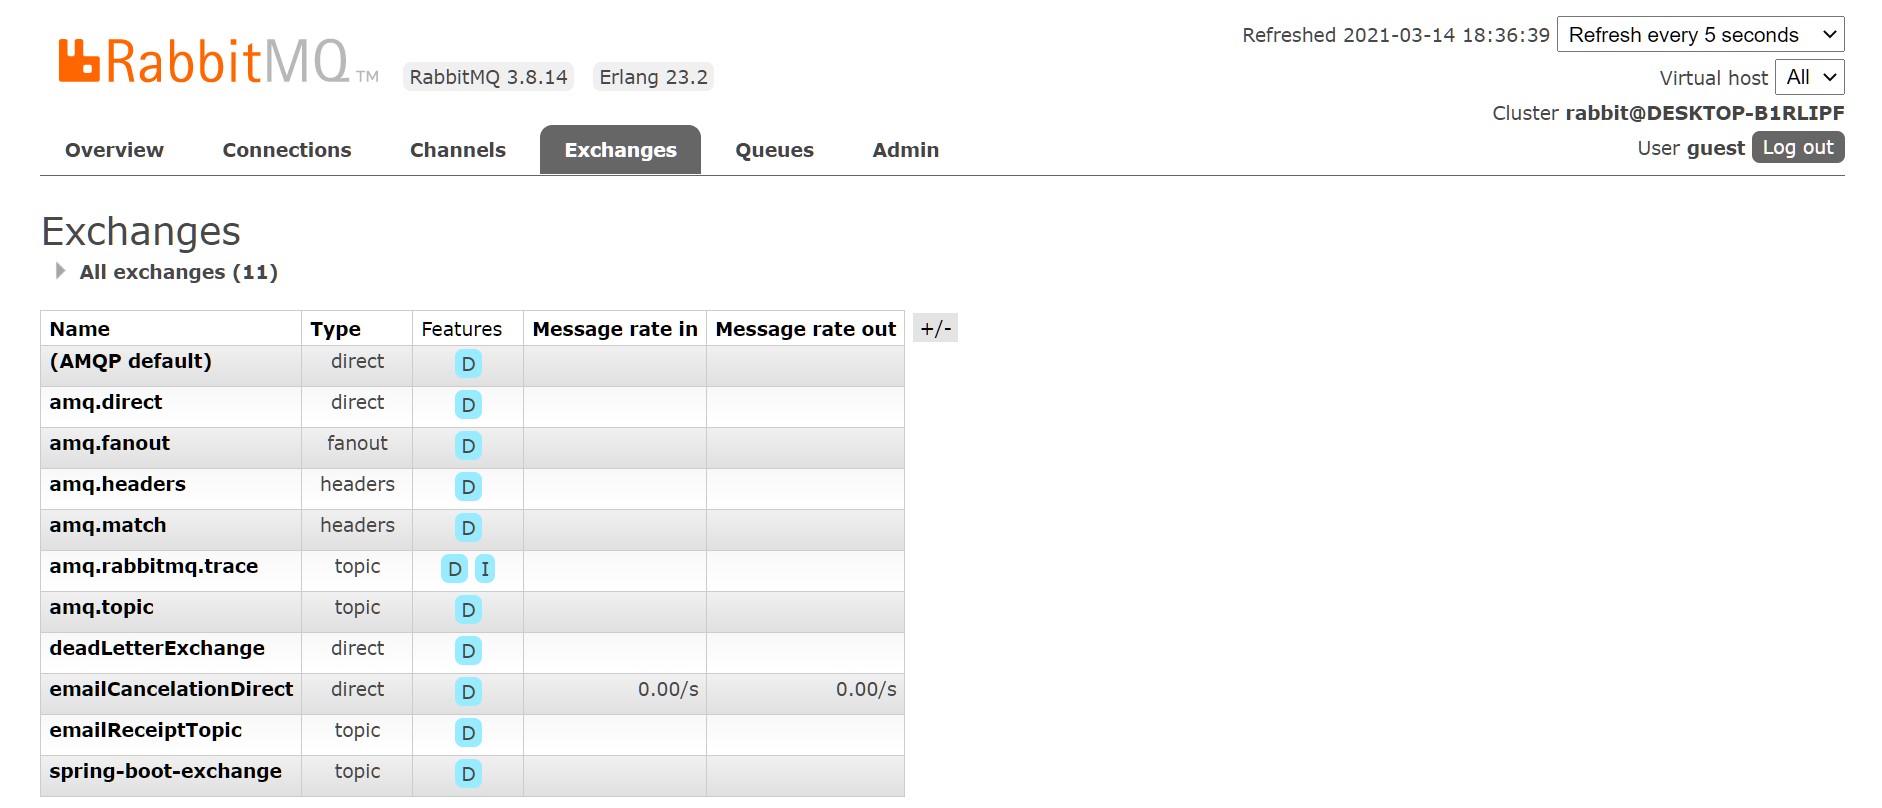
After enabling the console you can simply open your browser and go to http://localhost:15672. The default username and password for rabbitmq will be guest - guest. If you navigate to exchanges tab, you must be able to see our exchanges created and listed like below. There is also default exchanges that you could have safely use. But their name would not make any sense to programmers.
If you have sent messages to rabbitmq, you should be able to see them in the queues tab. Don't mind the numbers in this picture. The number of ready messages are received from the producer. Rabbitmq holds them until someone starts listening to them. Will implement mailservice and rabbitlisteners and the numbers will go down to zero. The unacked messages are ready in the queue and are being listened. This is the place where you should see the bottleneck. And total is, well, total of these two :) The unacked messages will drop into deadletter queue and stay there in ready state because nobody is listening to it.
Also, the state indicates whether the queue is being listened or not. It is idle by default. Whem someone starts listening and queue is sending messages, it will be running. DLX and DLK means we are using deadletter queues and routing keys for deadletter queues, if some messages are undeliverable. What is undeliverable? We will simulate it in the next post in mail service. By the way, you can also create these queues and exchanges in the management console like the images below.
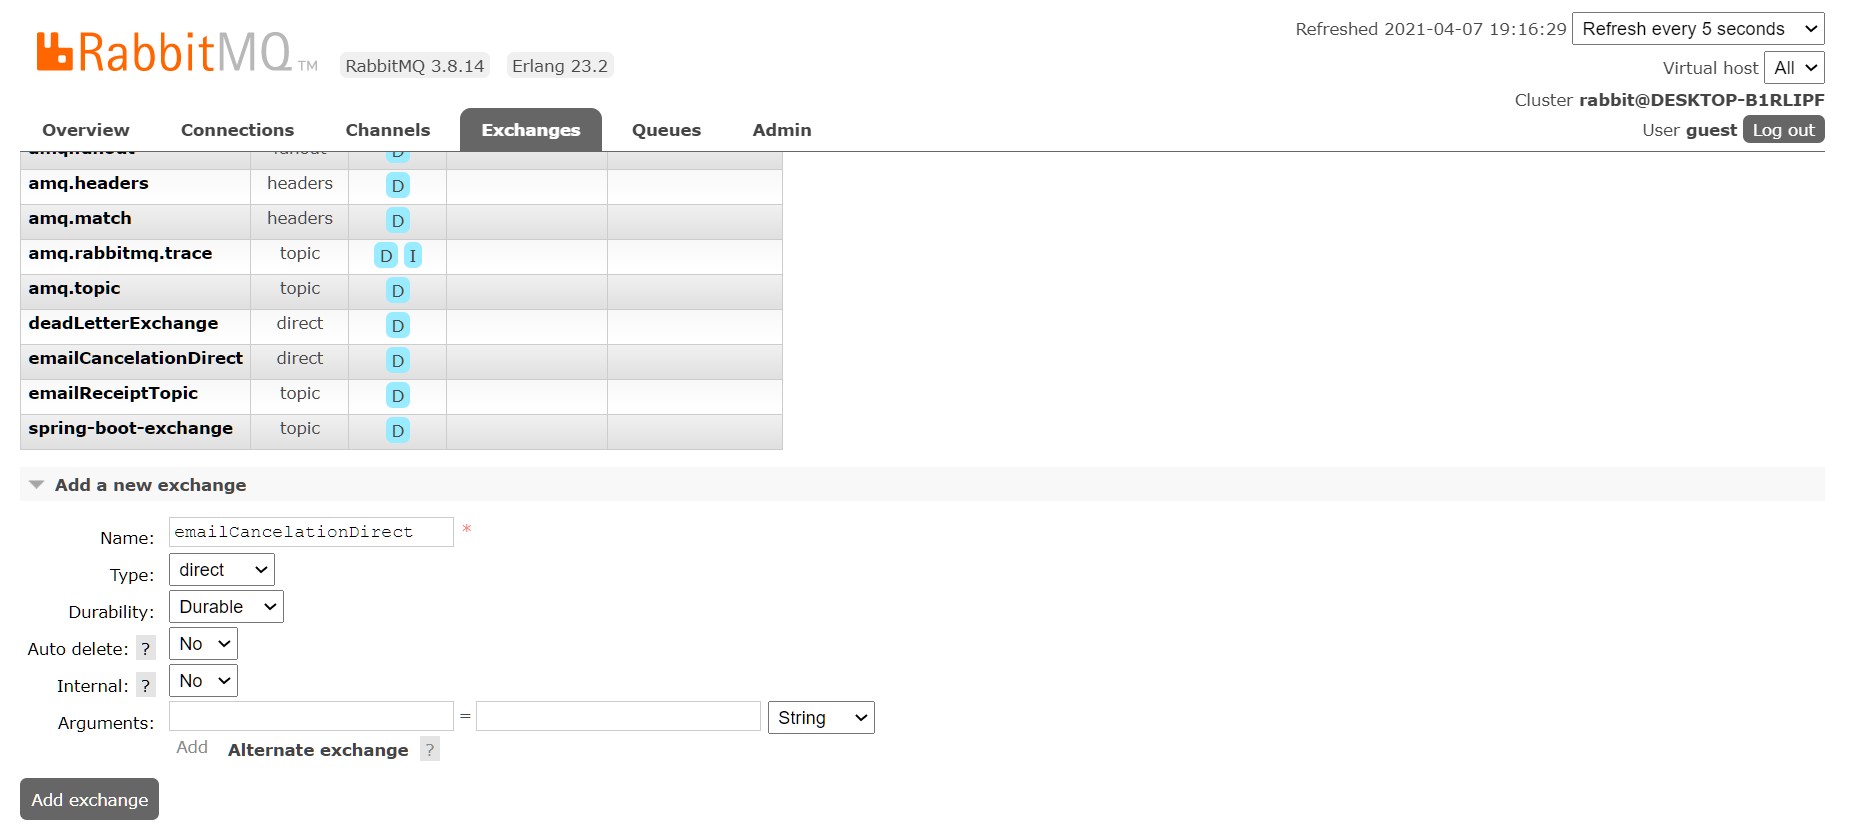
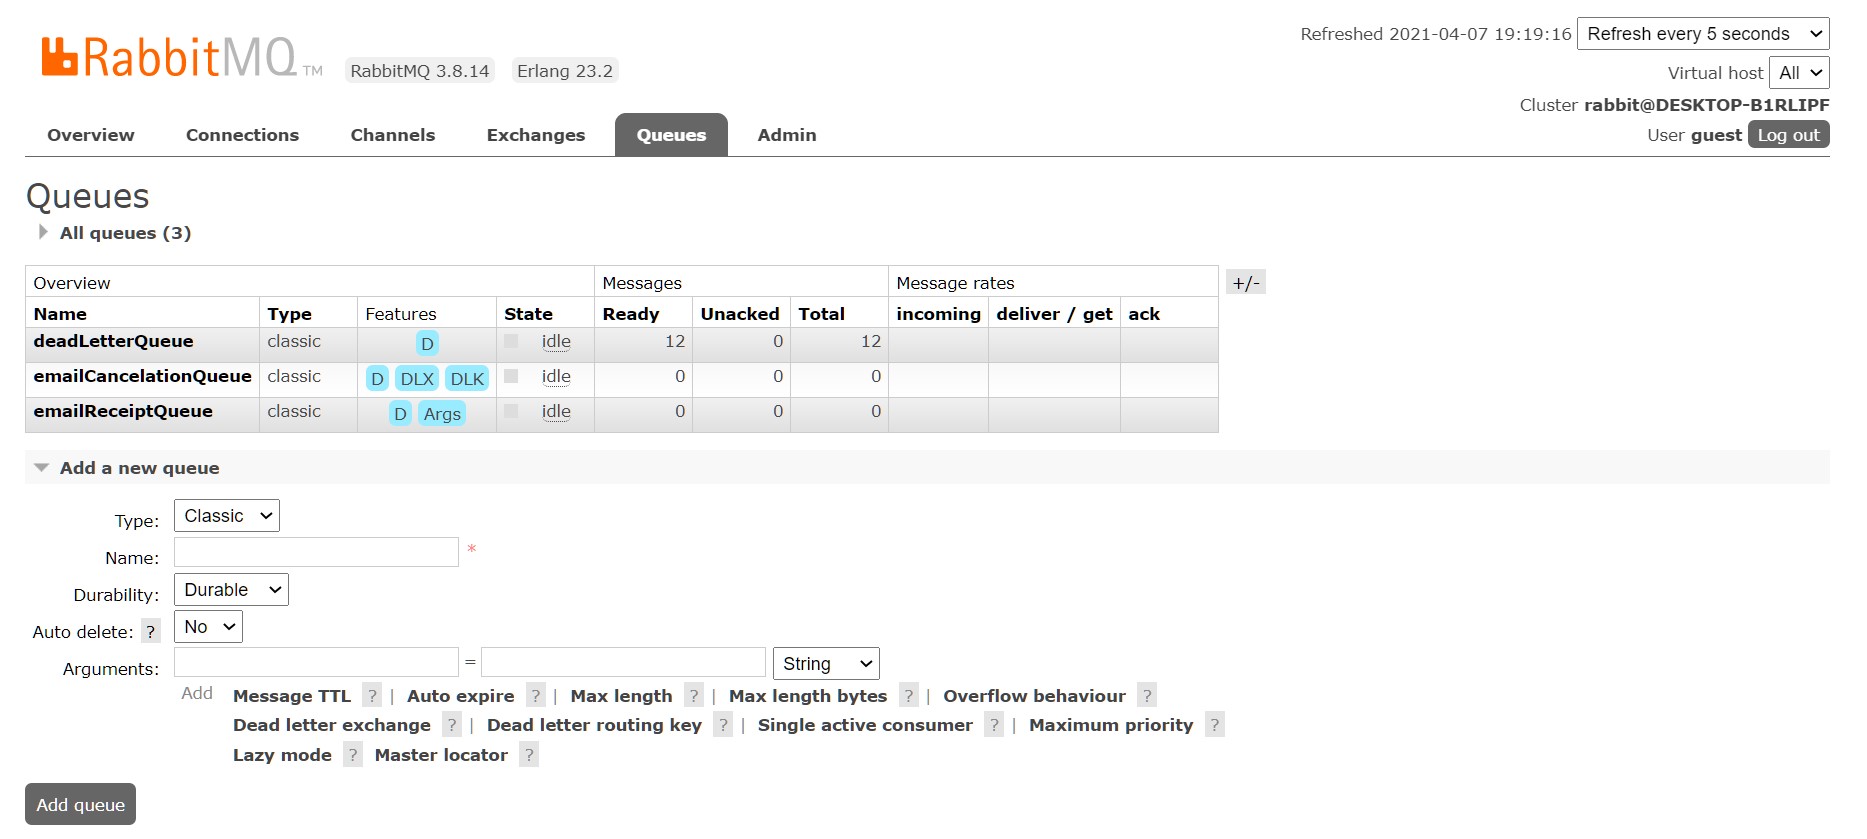
Notice all the options we have configured inside the config class is here too. At this step we have achieved sending messages to rabbitmq. It is time to listen to these queues. There will be an api in our newly created mail service. And this api will signal the queues to notfiy them. It also works the other way around of course, the queues will signal the listeners (like observer pattern). It is time to write the consumer codes. See you at the next post :)
Leave a comment