Spring Framework - Hibernate - JSP usage
In this post, i will show you how to create a web mvcx application using Spring Framework and Hibernate with JSP pages. Of course it will be a maven project. This way, you can take this project as a skeleton project for yourself and develop on top of it. So why it is just spring framework instead of spring boot?
We usually think of spring boot applications when we talk about mvc web applications nowadays and i embraced it too. But spring boot projects are usually heavily integrated with html files on the frontend. That is why it has some deficiencies when you use other frontend technologies like JSP or JSF. You can check out spring boot jsp limitations for more information. Furthermore, a spring boot application can cause heavy ram usage or big output war files due to autoconfigurations. Lastly, spring framework and jsp servlet technologies are still being used by change resistant dinosaur projects of change resistant minds of change resistant people. That is why i have developed this project as a basic skeleton project mostly for the projects that needs a change and update with minimal overhaul. I haven't been able to find a nice and minimal archetype for spring framework with hibernate, so i think this app will help.
Hibernate is a very popular ORM library (or tool) that takes care of jdbc and sql and connection management. That is why i have included it in this project and set the necessary settings. This way, we will see the background operations like autoconfigurations of a spring boot project and we will implement it. I will write and read a "book" entity to database for this small example. This is a kickstarter project.
I will share the codes and my comments inside here. I will also mention the key points. You can find the source code on github. The necessary knowledge to be able to run and understand this project is like below:
- Spring Framework, Maven and JSP knowledge
- Java 8 or java 11 installed on your computer
- Eclipse or any other IDE for java
- If you are using eclipse you might also need Lombok plugin
- Postgresql or any other RDBMS technology
Project creation
If you want to create the project from scratch, you can use maven-archetype-webapp archetype like the image below, while creating the maven project. This way, you will get the necessary folders for a web application like webapp and WEB-INF folders. Since we are not using a preset spring boot sturcture, and there are no up-to-date simple archetype for spring framework and hibernate, this is a good starting point.
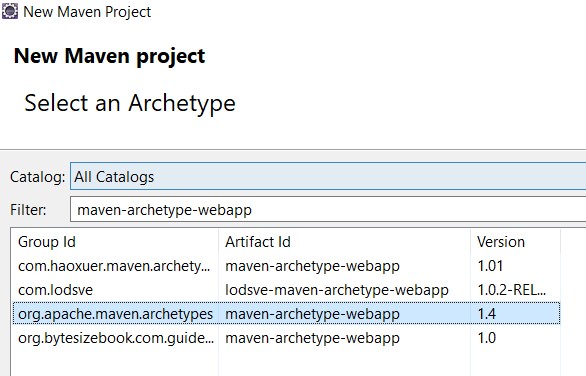
These are the main steps for your development at this point.
- Adding necessary dependencies for spring, hibernate and JSP
- Setting the spring dispatcherservlet settings in web.xml file
- Setting the mappings in -servlet.xml
- Not forgetting <context:component-scan base-package="com.myproject" /> at this point :)
- Creating ViewResolver and Datasource beans in a @Component class
- Writing the necessary mappings in a spring @Controller class
Let me show you the important code for you to be able to follow these steps.
pom.xml file and minimum requirements
Let's start with the minimal pom.xml file that we can use. We have mentioned 2 plugins here manually since we are not using a parent pom here like in spring boot. We have indicated java version of the project with maven compiler plugin. War plugin is the necessary plugin to export the project as a war file. We will use a war file, not a jar file.
We have acquired not only web properties, but also MVC functionalities thanks to Spring-webmvc here. For example, ModelAndView class is coming from this dependency. Spring-orm is a combination of spring jdbc and tx and some hibernate integrations. We are not using spring data jpa here, we are directly using entity managers and hibernate. You can check out the repositories. Hence, you can see hibernate-core down below. You need a compliance here between spring-orm and hibernate version, since the javax package name will be renamed to jakarta. We will need jstl dependency because we are using jsp tags in the frontend. Just like thymeleaf, we need a dependency to be able to produce jsp files here. postgresql the database i am using here. You can replace this with oracle or mysql or mssql ...etc.
<build>
	<plugins>
		<plugin>
			<!-- https://mvnrepository.com/artifact/org.apache.maven.plugins/maven-compiler-plugin -->
			<artifactId>maven-compiler-plugin</artifactId>
			<version>3.8.1</version>
			<configuration>
				<source>1.8</source>
				<target>1.8</target>
			</configuration>
		</plugin>
		<plugin>
			<!-- https://mvnrepository.com/artifact/org.apache.maven.plugins/maven-war-plugin -->
			<artifactId>maven-war-plugin</artifactId>
			<version>3.3.2</version>
		</plugin>
	</plugins>
</build>
<dependencies>
	<!-- spring web mvc covers all you need from spring to serve as web application
	with context and beans and all that jazz
	otherwise you would need bean, core, context, aop, web, expresion dependencies -->
	<dependency>
		<groupId>org.springframework</groupId>
		<artifactId>spring-webmvc</artifactId>
		<version>${spring.version}</version>
	</dependency>
	<!-- spring orm is basically spring TX + spring JDBC + some special classes
	Not relying on spring data jpa or anything, this project is hardcore hibernate
	WATCH OUT for compatibilities, spring5.3 says it is compatible with hibernate 5.2/5.3/5.4 -->
	<dependency>
		<groupId>org.springframework</groupId>
		<artifactId>spring-orm</artifactId>
		<version>${spring.version}</version>
	</dependency>
	<!-- JSTL library to be able to render JSP pages tags-->
	<dependency>
		<groupId>javax.servlet</groupId>
		<artifactId>jstl</artifactId>
		<version>1.2</version>
	</dependency>
	<dependency>
		<groupId>org.hibernate</groupId>
		<artifactId>hibernate-core</artifactId>
		<version>5.6.3.Final</version>
	</dependency>
	<dependency>
		<groupId>org.postgresql</groupId>
		<artifactId>postgresql</artifactId>
		<version>42.3.1</version>
	</dependency>
</dependencies>
Web.xml and servlet.xml files
There are a couple of key points in the web.xml file. First is the namespaces we use. If there is a namespace error, our IDE may not be able to see the tags or properties. Below that we have a servlet description. Since we are developing spring framework application, we are using DispatcherServlet of spring, which is an HttpServlet extension. We should also define mapping information with the exact same servlet name. This way, the incoming requests will be directed to this servlet. Notice i can't use /* path here. Because it will try to handle every forwards or return values itself, resulting in an infinite loop.
<?xml version="1.0" encoding="UTF-8"?>
<web-app xmlns:xsi="http://www.w3.org/2001/XMLSchema-instance" xmlns="http://xmlns.jcp.org/xml/ns/javaee" xsi:schemaLocation="http://xmlns.jcp.org/xml/ns/javaee http://xmlns.jcp.org/xml/ns/javaee/web-app_4_0.xsd" id="WebApp_ID" version="4.0">
	<servlet>
		<servlet-name>defaultservlet</servlet-name>
		<!-- Servlet xml name must be defaultservlet-servlet.xml because of the naming convention of webapps -->
		<servlet-class>org.springframework.web.servlet.DispatcherServlet</servlet-class>
		<load-on-startup>1</load-on-startup>
	</servlet>
	<servlet-mapping>
		<servlet-name>defaultservlet</servlet-name>
		<!-- DON'T change it to (/*) -->
		<!-- otherwise it will keep looking for get or post mapping urls in your controllers instead of returning the jsp pages -->
		<!-- Also, all my JSP files are in the same folder, so all i need is one / url mapping here -->
		<!-- otherwise you would need different patterns like /book /user /shop ..etc -->
		<url-pattern>/</url-pattern>
	</servlet-mapping>
</web-app>
My servlet is named defaultservlet so i had to create defaultservlet-servlet.xml file. This is a fixed format. Xml namespaces are important here too. You can create beans and set the necessary context settings here. You can also set transaction or mvc or viewresolver or datasource settings. I chose to create these beans in beanfactory class. The most important setting for spring framework here is the context:component-scan. We set the base package for all of our @Component, @Repository, @Service, @Configuration classes so that spring can scan all of them recusively.
<?xml version="1.0" encoding="UTF-8"?>
<beans xmlns="http://www.springframework.org/schema/beans" xmlns:context="http://www.springframework.org/schema/context" xmlns:xsi="http://www.w3.org/2001/XMLSchema-instance" xsi:schemaLocation="http://www.springframework.org/schema/beans
        http://www.springframework.org/schema/beans/spring-beans.xsd
        http://www.springframework.org/schema/context
        http://www.springframework.org/schema/context/spring-context.xsd">
	<!-- Don't forget the schemas, otherwise you can't use mcv or context or bean definitions here -->
	<context:component-scan base-package="com.numankaraaslan" />
	<!-- If you forget component-scan property here, spring will not be able to scan your controllers or beans or stereotypes -->
	<!-- You can also initialize all the beans and transaction settings here, i did it in BeanFactory class -->
</beans>
Bean factory class and the necessary beans
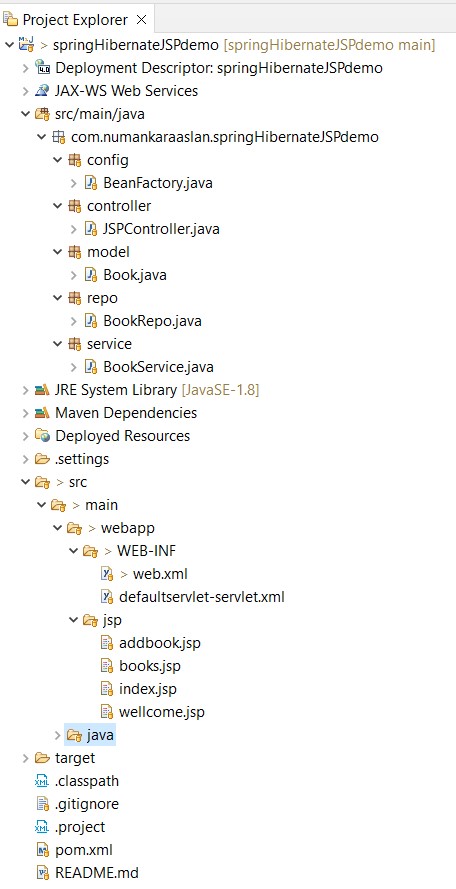
I have chosen to create the spring beans with java code, to avoid complicating the servlet.xml file. FIRST, notice the imports here. The ViewResolver bean will tell the spring to look for a "hello.jsp" file inside the "jsp" folder inside the webapp folder, if i return "hello" from a controller. Also notice the project folder structure here.
Datasource bean is the necessary bean to connect to the database with postgresql. And since the hibernate is utilising this datasource, we need to tell hibernate how to behave. Thus we need LocalSessionFactoryBean bean. This is a spring-orm class. You can set the properties with setHibernateProperties method. Here, hbm2ddl.auto and dialect is important. hbm2ddl.auto will automatically create the tables on application startup. Dialect must be compatible with the postgresql version you are using. You can change this code to read the properties from a "hibernate.cfg.xml" file manually if you want.
Lastly, we have another spring-orm bean here. HibernateTransactionManager tells the spring framework the class that should be used when we add @Transactional annotation on top of the repository methods to handle the transactions. Notice the dependsOn relations here. The @EnableTransactionManagement annotation on top of the class means this application must manage the transactions. In other words, i am too lazy to handle transactions myself. This is our minimal configuration for this class.
import java.util.Properties;

import javax.sql.DataSource;

import org.springframework.beans.factory.annotation.Autowired;
import org.springframework.beans.factory.annotation.Qualifier;
import org.springframework.context.annotation.Bean;
import org.springframework.context.annotation.Configuration;
import org.springframework.context.annotation.DependsOn;
import org.springframework.context.annotation.Profile;
import org.springframework.jdbc.datasource.DriverManagerDataSource;
import org.springframework.orm.hibernate5.HibernateTransactionManager;
import org.springframework.orm.hibernate5.LocalSessionFactoryBean;
import org.springframework.transaction.annotation.EnableTransactionManagement;
import org.springframework.web.servlet.ViewResolver;
import org.springframework.web.servlet.view.JstlView;
import org.springframework.web.servlet.view.UrlBasedViewResolver;

@Configuration
// this is tx:annotation-driven
@EnableTransactionManagement
public class BeanFactory
{
	// All these can be defined in defaultservlet-servlet file
	// tx:annotation-driven and bean definitions ...etc.

	@Bean
	public ViewResolver viewResolver()
	{
		// If i return "wellcome" as modelandview object, the resolver will look for /jsp/wellcome.jsp inside the webapp folder
		UrlBasedViewResolver resolver = new UrlBasedViewResolver();
		resolver.setPrefix("/jsp/");
		resolver.setSuffix(".jsp");
		resolver.setViewClass(JstlView.class);
		return resolver;
	}

	@Bean(name = "datasource")
	@Profile(value = "default")
	public DataSource dataSource()
	{
		DriverManagerDataSource dataSource = new DriverManagerDataSource();
		dataSource.setDriverClassName("org.postgresql.Driver");
		dataSource.setUrl("jdbc:postgresql://localhost:5433/postgres");
		dataSource.setUsername("postgres");
		// change the password here
		dataSource.setPassword("yourpassword");
		return dataSource;
	}

	@Bean(name = "sessionFactory")
	@DependsOn(value = "datasource")
	public LocalSessionFactoryBean sessionFactory(@Autowired @Qualifier(value = "datasource") DataSource ds)
	{
		LocalSessionFactoryBean sessionFactory = new LocalSessionFactoryBean();
		sessionFactory.setDataSource(ds);
		// where are the model (@entity) classes
		sessionFactory.setPackagesToScan("com.numankaraaslan.springHibernateJSPdemo.model");
		sessionFactory.setHibernateProperties(hibernateProperties());
		// you can set configurations manually like
		// sessionFactory.getConfiguration().setProperty(propertyName, value);
		// OR from custom "/com/numankaraaslan/springjspdemo/persistence/hibernate.cfg.xml" like
		// SessionFactory SF = new org.hibernate.cfg.Configuration().configure("/com/numankaraaslan/springjspdemo/persistence/hibernate.cfg.xml").buildSessionFactory();
		return sessionFactory;
	}

	private final Properties hibernateProperties()
	{
		Properties hibernateProperties = new Properties();
		hibernateProperties.setProperty("hibernate.hbm2ddl.auto", "create");
		hibernateProperties.setProperty("hibernate.dialect", "org.hibernate.dialect.PostgreSQL10Dialect");
		return hibernateProperties;
	}

	@Bean(name = "txManager")
	@DependsOn(value =
	{ "datasource", "sessionFactory" })
	public HibernateTransactionManager getManager(@Autowired @Qualifier(value = "datasource") DataSource ds, @Autowired @Qualifier(value = "sessionFactory") LocalSessionFactoryBean sf)
	{
		return new HibernateTransactionManager(sf.getObject());
	}
}
A simple repository
We used hibernate to handle the database operations here. That means we are not using the preset jpa repositories of spring boot. Of course you can add spring-data-jpa dependency to your project and try to use JpaRepository here. I'm not sure if it will be properly functional. Let me write the basic code for database operations. Notice the @Transactional annotations. This will let the spring framework handle the transactions, utilising the hibernatetransactionmanager.
import java.util.List;

import org.hibernate.Session;
import org.hibernate.SessionFactory;
import org.springframework.stereotype.Repository;

import com.numankaraaslan.springHibernateJSPdemo.model.Book;

import lombok.AllArgsConstructor;

@Repository
@AllArgsConstructor
public class BookRepo
{
	private SessionFactory sessionFactory;

	@org.springframework.transaction.annotation.Transactional
	// NOT @javax.transaction.Transactional
	public void save(Book newBook)
	{
		Session session = sessionFactory.openSession();
		session.save(newBook);
		session.close();
	}

	@org.springframework.transaction.annotation.Transactional
	public List<Book> getBooks()
	{
		// let the spring handle the transaction
		Session session = sessionFactory.openSession();
		List<Book> books = session.createQuery("select b from Book b", Book.class).getResultList();
		session.close();
		return books;
	}
}
The model (or you can call entity) in this project is a very basic one and it is using the basic hibernate entity properties. You can see the code below but if you want to use your own schema in postgresql rather than the default public schema, don't forget to create your own schema. Also notice the annotations here.
import javax.persistence.Column;
import javax.persistence.Entity;
import javax.persistence.GeneratedValue;
import javax.persistence.GenerationType;
import javax.persistence.Id;
import javax.persistence.Table;

import lombok.AllArgsConstructor;
import lombok.Getter;
import lombok.NoArgsConstructor;
import lombok.Setter;

@Entity
@Table(schema = "springhibernate", name = "Book")
@Getter
@Setter
@AllArgsConstructor
@NoArgsConstructor
// Remember to create "springhibernate" schema in posgtresql database
// CREATE SCHEMA springhibernate AUTHORIZATION postgres; GRANT ALL ON SCHEMA springhibernate TO postgres;
public class Book
{
	@Id
	@GeneratedValue(strategy = GenerationType.IDENTITY)
	private int id;

	@Column
	private String name;

	@Column
	private int year;

	@Column
	private String author;

	public Book(String name, int year, String author)
	{
		this.name = name;
		this.year = year;
		this.author = author;
	}
}
A simple JSP page and a controller class
This application must be able to start and create the database table automatically after all these configurations. All we need to do is to establish the MVC structure. The controller below can work with urls like localhost:8080/books or localhost:8080/addbook. It will add objects like ${books} as models to modelandview objects like "new ModelAndView("books")" so that jsp pages can use them. Wehen it returns the "books" modelandview, the viewresolver will kick in and resolves it to /jsp/books.jps page and redirects it. This part is the same as a spring boot web service application.
import org.springframework.stereotype.Controller;
import org.springframework.web.bind.annotation.GetMapping;
import org.springframework.web.bind.annotation.ModelAttribute;
import org.springframework.web.bind.annotation.PostMapping;
import org.springframework.web.servlet.ModelAndView;

import com.numankaraaslan.springHibernateJSPdemo.model.Book;
import com.numankaraaslan.springHibernateJSPdemo.service.BookService;

import lombok.AllArgsConstructor;

@Controller
@AllArgsConstructor
public class JSPController
{
	private BookService bookService;

	@GetMapping("/books")
	public ModelAndView getBooks()
	{
		ModelAndView booksJSP = new ModelAndView("books");
		booksJSP.addObject("books", bookService.getBooks());
		return booksJSP;
	}

	@GetMapping("/addbook")
	public ModelAndView addbook()
	{
		ModelAndView booksJSP = new ModelAndView("addbook");
		booksJSP.addObject("book", new Book());
		return booksJSP;
	}

	@PostMapping("/addbook")
	public ModelAndView addbookPost(@ModelAttribute Book newBook)
	{
		bookService.save(newBook);
		return new ModelAndView("redirect:/books");
	}
}
Lastly, let me give you an example JSP file where i have listed these book objects. We can use expressions like "c:forEach" in JSP files with the help of JSTL tags, just like we use expressions like "th:each" in thymeleaf. This page is rendered on the server and it will be presented as a pure html file to the user. The <%@taglib prefix="c" uri="http://java.sun.com/jsp/jstl/core"%> namespace is important here. Also you can see "page language = "java"" on top of the page. You can write the books object that is coming from the modelandview class here. The foreach loop will use a varieble called book and you can access properties of the object with "book.name". This is done by reflection by invoking the getName method inside your model.
<%@ page language="java" contentType="text/html; charset=ISO-8859-1" pageEncoding="ISO-8859-1"%>
<%@taglib prefix="c" uri="http://java.sun.com/jsp/jstl/core"%>
<!DOCTYPE html>
<html>
<head>
<meta charset="ISO-8859-1">
<title>Spring JSP demo</title>
</head>
<body>
	<a href="index">home</a>
	<br/>
	<table>
		<thead>
			<tr>
				<th>Name</th>
				<th>Year</th>
				<th>Author</th>
			</tr>
		</thead>
		<tbody>
			<c:forEach items="${books}" var="book">
				<tr>
					<td>${book.name}</td>
					<td>${book.year}</td>
					<td>${book.author}</td>
				</tr>
			</c:forEach>
		</tbody>
	</table>
</body>
</html>
After all this, your project structure will look like the image below. It may not be best practice to put all the jsp files in a single folder here. But if have separated them into different folders, i would have to create more mappings in the web.xml file and it would be harder to link the pages with href from jsp files. Of course this is not an obstacle you can't overcome.
You can run a tomcat server inside your eclipse to run the application with "run as -> run on server" or you can deploy the war file manually to your own server at this point. I believe the tomcat version must be 8 or newer for this application. This may change due to the JDK version of your project. If you can run the application, you can reach localhost:8080/springHibernateJSPdemo/wellcome page. The context path here is my project name and yours can be different.
Ready to go with the minimal and simple configuration
We have successfully created a base project that uses spring framework and hibernate and JSP technologies. If you want to use thymeleaf instead of JSP, you can change the viewresolver. You would also have to add necessary the thymeleaf dependencies. Even though thymeleaf is a popular technology these days, you can use this project as basis to transform the old monolythical projects. At least, it looks like the dependencies and the versions i use in January 2022 seems to work. See you at the next post :)
Leave a comment